
Investing in Initial Public Offerings (IPOs) is an exciting way to grow your portfolio, and Kotak Mobile Banking Lite makes it seamless to approve IPO mandates. In this article, we’ll guide you step-by-step on how to place an IPO order using your Demat account and approve the IPO mandate via the Kotak Mobile Banking Lite app.
If you are not registered with new Kotak Lite mobile banking then download the application and activate in just 1 minute using your current mobile banking credentials.
Table of Contents
Step 1: Place an IPO Order from Your Demat Account
Before approving the IPO mandate, you need to place an IPO order through your Demat account and create UPI mandate. Follow these steps:
1. Login to Your Demat Account
- Open your Demat account application (e.g., Groww, Zerodha, etc.).
- Navigate to the IPO section and browse the list of active IPOs.
- Select the IPO you wish to apply for and click the Apply button.

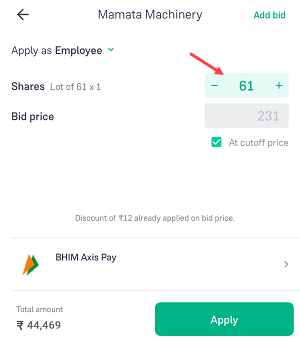
2. Enter Details for IPO Application
- On the next screen, enter the number of lots you want to apply for.
- Tap on the Edit Payment Option and enter your Kotak UPI ID.
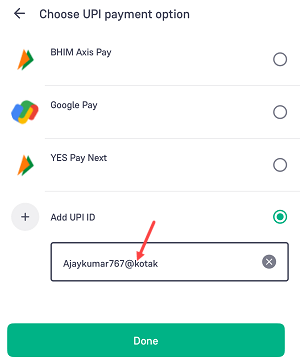
3. Use Kotak Mobile Banking Lite UPI ID
- If you don’t know your Kotak UPI ID, log in to the Kotak Mobile Banking Lite app and check it.
- Enter the UPI ID and click the Done button.
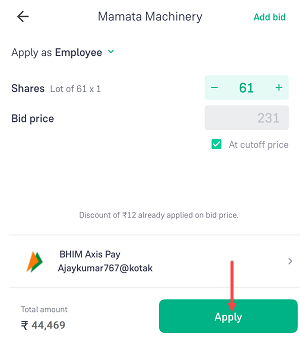
4. Submit the IPO Application
- Click the Apply button to submit your IPO application.
- Once submitted, the IPO mandate will be created and sent to Kotak Mobile Banking Lite for approval.
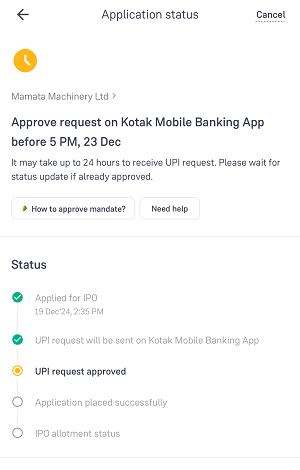
5. Wait for the Mandate Request
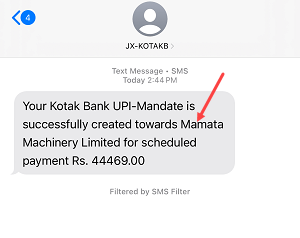
- It may take up to 4 hours for the IPO mandate request to appear in Kotak Mobile Banking Lite. You will receive an SMS notification once the mandate is ready for approval.
Step 2: Approve IPO Mandate on Kotak Mobile Banking Lite
After the IPO mandate request arrives, follow these steps to approve it:
1. Receive Notification
- You will get an SMS when the IPO mandate arrives in your Kotak Mobile Banking Lite app.
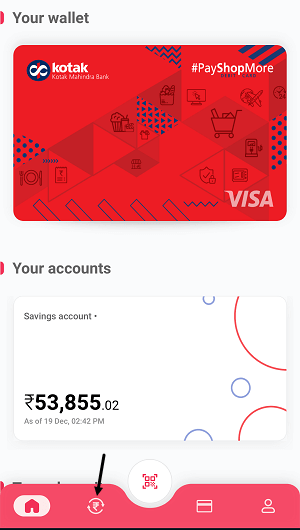
2. Log in to Kotak Mobile Banking Lite
- Open the app and log in to your account.
- Tap on the Rupee icon located at the bottom of the screen (refer to the screenshot below for guidance).
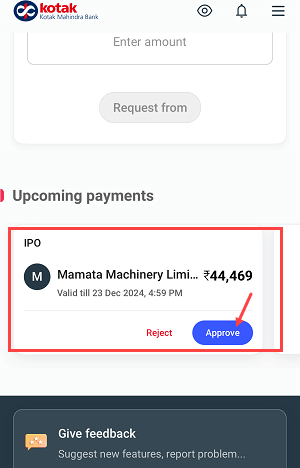
3. Locate the IPO Mandate Request
- Swipe up to view pending mandates.
- Locate the IPO mandate request and tap on the Approve button.
4. Confirm the Mandate
- On the next screen, review the details and click the Confirm button.
- Tap Submit to proceed.
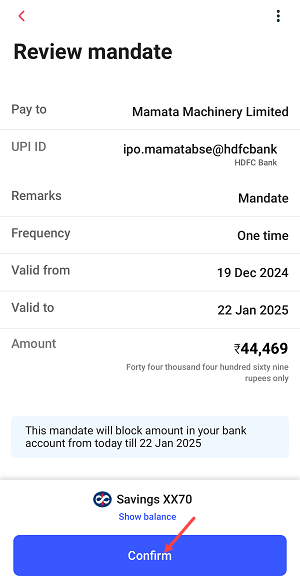
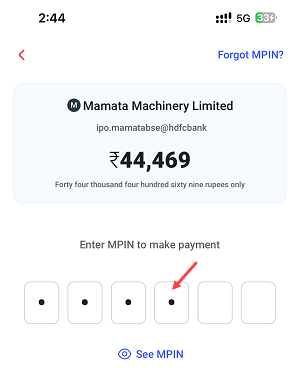
5. Authenticate the Request
- Enter your MPIN for authentication.
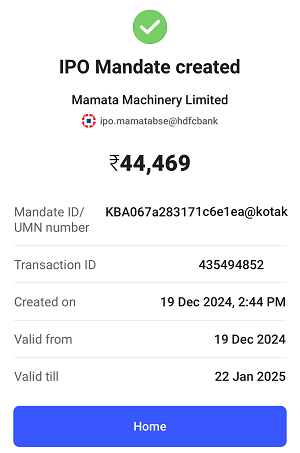
6. Mandate Approval Confirmation
- You’ve successfully approved the IPO mandate! The required amount will be blocked in your account. This amount may appear as debited, but it’s not; it’s merely blocked for the IPO application.
Step 3: Verify IPO Application Status
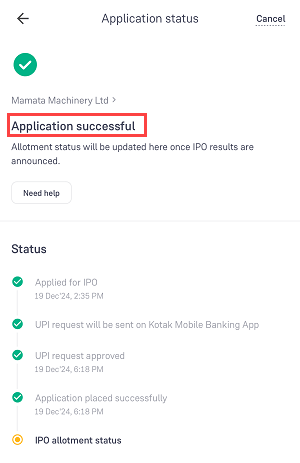
After approving the mandate, you can verify the status in your Demat account:
- Log in to your Demat account.
- Navigate to the Applied IPOs section.
- Check the status after a few hours to confirm that the application has been successfully submitted.
If you receive the allotment, the blocked amount will be debited from your account. If not, the blocked amount will be released back to your account within 24 hours once allotment done.
Final Thoughts
Approving IPO mandates using Kotak Mobile Banking Lite is straightforward and secure. By following these steps, you can ensure your IPO application is processed smoothly. If you are an Kotak bank customer then you don’t need to use any other UPI app to approve UPI IPO mandates. Just install Kotak Lite mobile banking and approve IPO mandates easily.